
Preserving the natural charm and durability of a log cabin in Minnesota requires careful attention and maintenance. Staining is a crucial aspect of this maintenance, as it not only enhances the aesthetic appeal but also protects the wood from the harsh Minnesota climate. In this comprehensive guide, we’ll outline the essential steps you need to follow for successful cabin staining. Whether you’re a seasoned cabin owner or a first-time owner, these expert tips will help you achieve stunning results and prolong the lifespan of your cabin.
10 Essential Steps for Staining a Log Cabin in Minnesota:
Preparing the Cabin Exterior
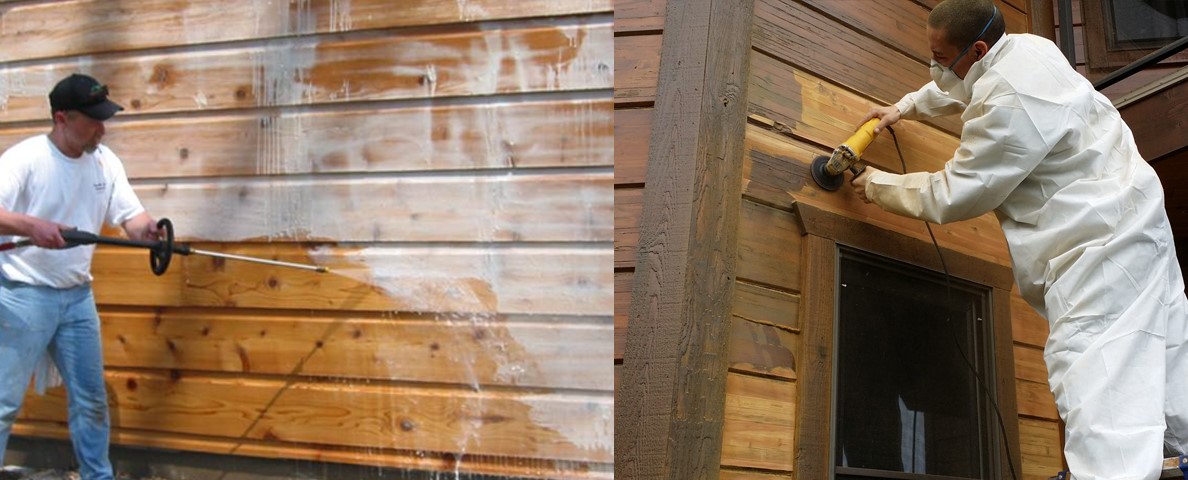
Before diving into the staining process, it’s imperative to prepare the cabin exterior adequately. Start by cleaning the surface thoroughly to remove dirt, mildew, and any previous coatings. Use a power washer or scrub brush along with a mild detergent to ensure a clean canvas for staining. Be careful using a pressure washer on your wood exterior. It is extremely important to use the correct nozzle and maintain the correct distance so that you do not gauge the wood which will lead to even further issues in the future. You can use any standard degreaser or household cleaner.
Inspecting and Repairing Damaged Areas
Carefully inspect the cabin for any signs of damage, such as cracks, gaps, or rotten wood. Repairing these areas before staining is crucial to prevent moisture infiltration and ensure uniform staining. Replace any damaged logs or boards and fill in gaps with a suitable sealant or wood filler.
Choosing the Right Stain
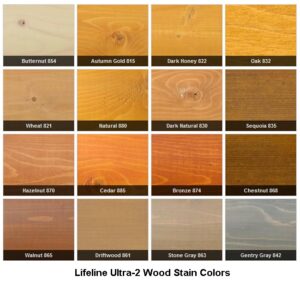
Selecting the appropriate stain is key to achieving the desired look and protection for your log cabin. Consider factors such as transparency, color, and UV resistance when choosing between oil-based, water-based, or hybrid stains. Opt for high-quality products specifically designed for exterior wood surfaces in Minnesota’s climate. At Lakelife Homes, we prefer to use the highest quality stains from Perma-Chink Systems. Although often more expensive, applying a high-quality stain will last much longer that cheaper alternatives and help protect your investment for years to come. You can view some of Perma-Chink’s stain options.
Testing the Stain
Before applying the stain to the entire cabin, it’s essential to conduct a small test patch to evaluate the color and absorption. Apply the stain to a hidden or inconspicuous area of the cabin and observe how it interacts with the wood. Make any necessary adjustments to the stain color or application technique based on the test results. This step comes down to your personal preferences. Typically, darker colors have a greater UV protection, but if a light stain fits your cabin’s style, they will work great as well.
Applying the Stain
Once you’re satisfied with the stain selection and test results, proceed with applying the stain to the entire cabin exterior. Use a brush, roller, or sprayer to evenly coat the wood surface with the stain, working in small sections to ensure uniform coverage. Pay special attention to corners, edges, and joints for thorough application. Having the right protective equipment is critical. Extension ladders, scaffolding, safety glasses and respritory masks are all critical to ensure everyone’s safety.
Allowing for Proper Drying
After applying the stain, allow sufficient time for drying before exposing the cabin to moisture or harsh weather conditions. Follow the manufacturer’s instructions regarding drying time and temperature requirements to ensure optimal results. Avoid staining if there is heavy rain in the forecast or intense direct sunlight during the drying process to prevent streaking or uneven coloring.
Applying Additional Coats (If Necessary)
Depending on the desired intensity of color and level of protection, you may need to apply multiple coats of stain. Allow each coat to dry completely before applying the next one, and assess the color and coverage between coats. Additional coats can enhance the richness of the color and prolong the lifespan of the stain.
Hire us to stain your log cabin
Leave it to the professionals. Contact us today and we'll give you a free quote for staining your cabin.
Sealing and Protecting the Surface
Once the stain has dried thoroughly, consider applying a protective sealant or topcoat to enhance durability and weather resistance. This step is often more critical on lighter shades of stain, but will be a beneficial for any style of stain. Choose a sealant specifically formulated for exterior wood surfaces and apply it according to the manufacturer’s instructions. This additional layer of protection will help safeguard your cabin against moisture, UV rays, and other environmental factors.
Routine Maintenance and Inspection
After completing the staining process, make a habit of regularly inspecting and maintaining your log cabin to ensure its long-term beauty and integrity. Keep an eye out for signs of wear, moisture damage, or insect infestation, and address any issues promptly to prevent further damage.
Preserving the Beauty of Your Log Cabin
By following these essential steps for staining a log cabin in Minnesota, you can effectively preserve its natural beauty and integrity for years to come. From thorough preparation to proper application and ongoing maintenance, each step plays a crucial role in ensuring the longevity and aesthetic appeal of your cherished retreat.
Frequently Asked Questions:
How often should I stain my log cabin in Minnesota?
In Minnesota’s climate, staining your log cabin is crucial for protection against harsh weather conditions like snow, ice, and UV rays. Typically, it’s recommended to stain your log cabin every 3 to 5 years. However, this can vary based on factors such as the type of stain used, the exposure of your cabin to sunlight and moisture, and the quality of the previous stain job. Regular inspection is key; if you notice fading or peeling, it’s time for a fresh coat of stain to maintain the integrity and beauty of your cabin.
Can I stain my log cabin in cold weather?
Staining your log cabin in cold weather can be challenging but not impossible. Ideally, you want to avoid staining when temperatures drop below 50°F as it can affect the stain’s ability to properly adhere and dry. However, if you must stain during colder weather, choose a stain specifically formulated for lower temperatures and follow the manufacturer’s guidelines closely. Additionally, ensure the logs are clean, dry, and free from frost before applying the stain. It may take longer for the stain to dry in cold weather, so allow for sufficient drying time between coats and protect the freshly stained surfaces from freezing temperatures until the stain has fully cured.
What is the best time of the year to stain a log cabin in Minnesota?
The best time of year to stain a log cabin in Minnesota is typically during the warmer months, ideally in late spring or early summer, when temperatures consistently stay above 50°F. This allows the stain to adhere properly and dry effectively. Late summer or early fall can also be suitable times, as long as you can avoid staining too close to the onset of colder temperatures. Avoid staining during extremely hot or humid weather, as this can cause the stain to dry too quickly or not adhere properly. Ultimately, aim for a time when the weather forecast indicates a stretch of mild, dry conditions for the best results.
Do I need to sand my log cabin before staining?
Whether or not you need to sand your log cabin before staining depends on the condition of the logs. If the logs are rough or have rough patches, sanding can help create a smoother surface for better stain adhesion and a more uniform finish. Sanding also helps remove any old stain, dirt, or debris that may interfere with the staining process.
However, if the logs are already smooth and in good condition, sanding may not be necessary. In such cases, thoroughly cleaning the logs with a log cleaner or mild detergent and water to remove any dirt or grime should suffice before staining.
Ultimately, the decision to sand or not should be based on the current condition of your log cabin and your desired outcome. If in doubt, a light sanding can often improve the final result, but be sure to follow up with proper cleaning and preparation before applying the stain.
Can I apply stain over existing stain?
Yes, you can apply stain over existing stain, but there are some important considerations to keep in mind:
- Compatibility: Ensure that the new stain you plan to apply is compatible with the existing stain. This is particularly important if the existing stain is oil-based and you plan to apply a water-based stain, or vice versa. Using incompatible stains can lead to poor adhesion and a blotchy or uneven finish.
- Preparation: Thoroughly clean the surface to remove any dirt, grime, or mildew that may have accumulated on the existing stain. Sanding may also be necessary to roughen up the surface slightly and promote better adhesion of the new stain.
- Testing: Before applying the new stain to the entire surface, it’s a good idea to test it in a small, inconspicuous area to ensure compatibility and achieve the desired color and finish.
- Coverage: Keep in mind that applying a new stain over an existing one may result in a slightly different color than applying the new stain to bare wood. The existing stain may alter the final color, so be prepared for potential variations.
Overall, applying stain over existing stain is possible with proper preparation and compatibility considerations. Just be sure to clean and prepare the surface adequately and test the new stain beforehand to ensure satisfactory results.
How long does it take for stain to dry on a log cabin?
The drying time for stain on a log cabin can vary depending on factors such as the type of stain used, weather conditions, and the porosity of the wood. In general, most stains require around 24 to 48 hours to dry completely. However, this can vary significantly based on factors such as temperature, humidity, and airflow.
Warmer temperatures and lower humidity levels typically promote faster drying times, while cooler temperatures and higher humidity can prolong the drying process. Additionally, stains with longer drying times or those applied in thicker coats may take longer to dry.
It’s important to allow the stain ample time to dry between coats, typically around 24 hours, to ensure proper adhesion and a uniform finish. Avoid exposing the freshly stained surfaces to moisture or heavy traffic until the stain has fully dried to prevent smudging or damage to the finish.
Always refer to the manufacturer’s instructions for specific guidance on drying times and other application recommendations for the stain you’re using.
Staining a log cabin in Minnesota is not just about enhancing its appearance; it’s about preserving its essence and longevity. By following the outlined steps and addressing common concerns, you can embark on this maintenance journey or hire a professional to prolong the life of your Minnesota cabin.
